This article was written in Feb 2022. Just reposting here. With Australia’s largest bank offering crypto trading in their mobile app and CBDC gaining interest, is there something more ominous on the horizon knocking on the doors of the decentralised token economy? The introduction of Bitcoin in 2008 brought the concept of decentralisation back into the spotlight. Decentralised peer to peer technology has existed in many forms prior to Bitcoin with Napster, Gnutella and Bittorrent to name a few. But not only is decentralised technology back, it is flourishing in this new blockchain based token economy and this is important because the war between centralisation and decentralisation is reigniting. In the early days, banks dismissed Bitcoin technology as a small bunch of enthusiastic, geeky, hobbyists thinking that they could change the world. Very certain it was going to be a fad, the banks ignored us. When it grew to the size of an ant, gnawing at the toenails of the elephant banks, the elephant stomped all over us closing bank accounts often with little reason and little warning. Then it grew big enough not only to catch more attention from the banks, but believe it or not, some banks started […]
Read More ›
To debug a SubQuery project, the –inspect flag of the node command needs to be used. The command is: Eg: This enables the node inspector. Note the small difference between –inspect and –inspect-brk. Then open up the Developer Tools in Chrome and you should see a green icon appear. Clicking on the green icon will open up the DevTools. From here, navigate to the “Filesystem” and add your project folder to the workspace. Then you can add breakpoints and step through your code just like any regular debugger.
Read More ›
Introduction What we will do here is to write a query to list all the transaction for a given Polkadot address as seen in the screenshot below. Pre-requisites Have gone through the SubQuery Hello World exercise. This ensures your environment has all the required applications. Step 1: Run subql init This will set up the scaffolding making everything a lot easier. Step 2: Create a schema The first step is to create your schema file which “defines the shape of your data”. Here we will define 2 entities or objects, Account and Transfer. Step 3: Update the manifest file In the manifest file, we want to create a handler called handleTransfer (to be written next). This is a standard substrate/Eventhandler and we will filter on the balances module. The filter is optional but recommended as they significantly reduce the amount of data processed by your SubQuery project and will improve indexing performance. Step 4: Writing the mappings This is perhaps the most challenging part for those still learning SubQuery and Polkdadot. What the code below does is create a helper function called “ensureAccounts” and a handleTransfer EventHandler function to grab the transferred amount along with the to and from Id. […]
Read More ›
Here I catch up with Alex Sims, an Associate Professor in the Department of Commercial Law and a Research Fellow at the UCL Centre for Blockchain Technologies. She teaches a wide range of commercial law subjects. Her primary areas of research and publication are on blockchain technology, in particular, DAOs (decentralised autonomous organisations), the regulation of cryptocurrencies and legal issues surrounding smart contracts. It was great to get some insights into her research and understand more about DAOs, NFTs and lots of other interesting facts along the way.
Read More ›
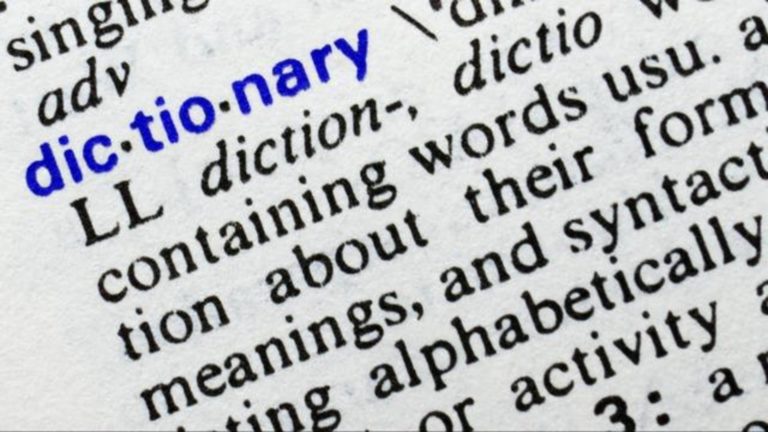
To understand what the SubQuery dictionary is and how it works, it is important to understand what SubQuery is and how it works. If you already have an understanding, feel free to skip this step. What is SubQuery? SubQuery is a project that provides an SDK for developers to easily extract data from Substrate blockchains. For example, if you wanted to know how many accounts have made over 200 transactions or the total amount staked for a particular address, or anything else you care to wonder, you can do this easily and quickly with SubQuery. Traditionally, you would have to create a node either locally or on a hosted infrastructure, then wait for it to synchronise and then code up your query asking for the data you need. With about 130GB of unstructured data and over almost 6 million blocks this could take days to synchronise. What SubQuery does is fetch every block through the Polkadot API and places it in a buffer for later processing. The indexer (aka node) then takes the block out from the buffer, and while extracting the block data, checks whether the events and extrinsics (aka transactions) within the block matches the user-defined filter. As you […]
Read More ›
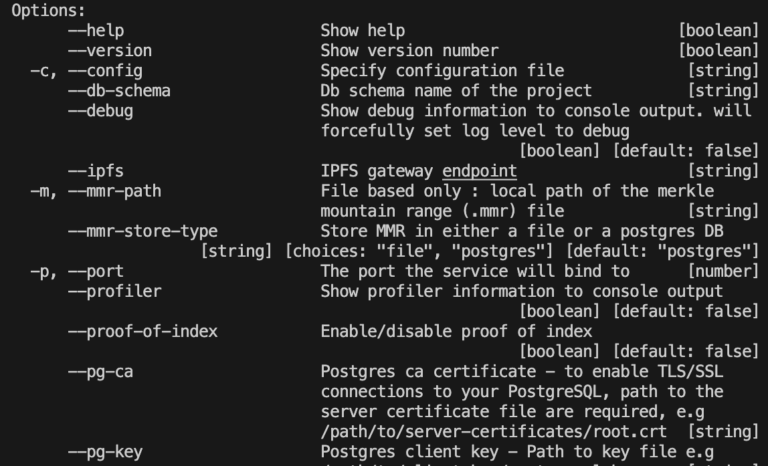
Sometimes the help within the command line can be a bit confusing as you can see below. Here I will explain what the various flags mean and also provide examples. Flags –version -f, –subquery This flag is the most important because it actually starts the subquery node. –subquery-name TBA This flag is very interesting. When used it creates a seperate schema and starts the block synchronising from zero. It is almost creating another “instance” of your project. Will create 3 schemas as shown below. -c, –config This flag will read the various configurations explained here from a file. Create a yaml file with the following: Name the file subquery_config.yml (the name does not matter). Place the file in the same directory as the project. The . means “the current directory”. Then with terminal in the project directory, run: –local This flag is primarily used for debugging purposes where it creates the default starter_entity table in the default “postgres” schema. Note that once you use this flag, removing it won’t mean that it will point to another database. To repoint to another database you will have to create a NEW database and change the env settings to this new database. In […]
Read More ›
At first, it may sound confusing but running an indexer is synonymous to running a node which will “index” the blockchain and store the data in a database. To be more precise, the @subql/node implementation will extract substrate-based blockchain data (aka on the PolkaDot network) and save it into a Postgres database. Currently you don’t “join” a network. You create a SubQuery project and “run” it. Postgres The first thing you will need to do is to install Postgres. Visit https://www.postgresql.org/download/ and install version 12 or higher. SubQuery node To install the SubQuery node application, run The -g flag means to install it globally which means on OSX, the location will be /usr/local/lib/node_modules Once installed, check out the possible flags with the help command. #Connecting to a database Use the export command to set the environment variables as shown below. Typing “env” should list your current environment variables and note that these variables are only set temporarily. In other words, they are only valid for the duration that the terminal window is open for. You can make it more permanent by creating these in your ./bash_profile. Starting a project To start a project, use the -f flag. For example, Postgres […]
Read More ›
How to start at a different block height? TL;DR To start a SubQuery node synchronising from a non-zero height, all you have to do is to modify your project.yaml file and change the startBlock key. For example: Why NOT start from zero? The main reason is that it can take a long time synchronising the entire Polkadot mainnet blockchain. Picking a start block such as 500,000 or 1,000,000 allows you to synchronise with the network faster. The other reason is that if you know that you are only interested in say all transactions in the last 30 days, you can figure out the block height 30 days ago and start synchronising from there. What are the drawbacks of not starting from zero? The most obvious drawback will be that you won’t be able to query for data on the blockchain for blocks that you don’t have. How to figure out the current block height? Visit https://polkascan.io/ and pick your network. It will most probably be: https://polkascan.io/polkadot. You’ll then see the block height under “Finalised Block”. Why is it not working? The most common problem that you will encounter is that you did not delete your .data hidden folder. If this […]
Read More ›
The SubQuery starter project is great way to get up and running very quickly. One drawback however is that it labels its field as “field1, field 2” etc and that it attempts to demonstrate the 3 types of mapping functions, namely block handlers, event handlers and call handers all in one go. This isn’t a bad thing but it can be slightly overwhelming for a beginner. Here, we’ll strip everything down to its bare minimum. TL;DR Delete all the field variables leaving field 1, but rename field1 to blockHeight Remove the handleEvent and handleCall from the mappingHandlers.ts to leave only handleBlock. Update the project.yaml file to remove the unnecessary mapping handlers (linked to #2). Pre-requisite Start by running the standard init command: If you are not sure what the above means, check out this. Step 1: Modify the variables Change the schema.graph from: to We are a) giving the variable a meaningful name and b) simplifying by removing what is not necessary. Step 2: Just keep handleBlock In the mappingHandler.ts file of the default starter project, delete the handleEvent and the handleCall function. We’ll look at these later on. This is what the file should look like. Step 3: Update […]
Read More ›
In SubQuery, you can log messages on 3 different levels. They are: For example, adding “logger.info(“info test”) results in: The same can be done with warnings. However, to add a debug log, an extra modification needs to be made. The docker-compose.yaml file needs to have an additional –log-level=debug command passed to it. Here is a screenshot of the docker-compose.yaml file from the Hello World starter project. Also don’t forget to regenerate and build the code first via: and then running:
Read More ›
SubQuery provides a very convenient service where you can host your projects for free and the best part about it is that you can get it up and running in less than 5 minutes. Pre-requisites You will have wanted to have gone through the Part 1: Subql Hello World in less than 5 mins tutorial first because tutorial is exactly the same except for the last step. Instead of running the query in Docker, we will run it in SubQuery. You will also need a GitHub account and have pushed your code to a repository. This is because SubQuery will read your code from GitHub. Set up GitHub Log into your GitHub account and create a repository by clicking on “new” in the repository tab. Provide a repo name and choose your visibility and initialisation preference. I’ve left everything as the default for now. Then hit “Create repository”. Once you have this repository, we’ll create our template starter project and push it to this repo. Create your project Next, let’s create a starter project template with the following command: You don’t have to make the project name the same as the repository name but I find that it helps. Then […]
Read More ›
Bryan Ventura is a senior lawyer at MinterEllisonRuddWatts. He specialises in financial regulation, investment law, commercial law, FinTech and virtual assets (cryptocurrencies). His work history includes working as an in-house lawyer at NZX (NZ’s only licensed securities exchange) as well as various business and investment endeavours. Bryan discovered his passion for blockchain technology several years ago when he read the Bitcoin whitepaper. He has since advised or worked on various blockchain and virtual asset (cryptocurrency) projects. Bryan is currently the interim-Chair of the Executive Council of BlockchainNZ. In a short time, he has driven the passion projects of (1) virtual asset service provider regulation (2) virtual asset service providers’ access to banking and (3) digital identity.
Read More ›
Understanding a GraphQL schema is very confusing at first. There is no scroll bar so you don’t know how long the document is, the structure is hard to visual, and there is a lot of superfluous information for beginners. The trick The trick is to copy all the data into something like https://jsonformatter.org/ and then minimise each section. What is interesting is that within the Query type, there is blockTs and blockT and it is obvious here that blockT requires an argument of id which is of type String and is mandatory, indicated with the exclamation mark.
Read More ›
Introduction Once you have your project up and running, the next task is to write queries for the data you want to retrieve. Back in the good old days, queries would conjure up the nostalgic SQL SELECT * FROM some_table_name. Nowadays things have changed somewhat. In your playground, ie localhost:3000 if you are running your project in a docker container, you will see two tabs on the right hand side labelled DOCS and SCHEMA. These drawers shoot out when you click on them and they are your bible in understanding what information is available to be queried. It can be daunting to first timers but we’ll step through some concrete examples to understand what this all means. The block timestamp project Before we examine the docs and the schema of this project, if you want to follow along, you’ll have to get the project up and running with a few simple commands. Then navigate to localhost:3000 and you should see the screenshot show above. Expanding each of these tabs will present you with the keywords that you can use to query your node for data. What you can see here is that there are 6 queries you can execute. query, […]
Read More ›
Introduction They say that cooking is quick and easy, it’s the preparation that takes all the time. In coding, it is no different. Getting a Hello World example up and running is quick, but the preparation takes a bit of time. Here we’ll spin up a Hello World sample in less than 5 mins but only if you have the right ingredients. This example will spin up a Subql node, a Graphql engine and a Postgres database. It will then synchronise with the live Polkadot mainnet blockchain, and then allow you to query for the block height. First, let’s do a quick pre-requisite check. Prerequisite check: Run the following: For more advanced users, copy and paste the following: This should return: If you get the above, then you are good to go. If not, install the required applications. Subql Hello world Let’s initialise a starter project with the name subqlHelloWorld. Note that only Author is mandatory. Next change into this directory. Now do a yarn or node install. I’ll use yarn here. Then run yarn codegen Then yarn build: Then run the docker command: This will kick everything into life where eventually you will get blocks being fetched. Navigate to […]
Read More ›
Let’s take look at what the subql docker-compose.yml means. Take for example the yaml file from the starter tutorial. Service The service tag lists all the containers which are included in the compose file and acts as there parent task. (A service definition contains configuration that is applied to each container started for that service). Here there are services defined. postgress, subquery-node and graphql-engine. Image The base image of a container can be defined by either using a pre-existing image on DockerHub or by building an image using a Dockerfile. Here a predefined image from DockerHub is used with the image tag. Specifically postgres:12-alpine, onfinality/subql-node:latest and onfinality/subql-query:latest. Port We then define which port we want to expose and the host port it should be exposed to. eg 5432:5432 for host:container. The ports here are a straight same for same mapping. (A non same mapping would be something like 8080:80). Volumes Volumes are Docker’s preferred way of persisting data which is generated and used by Docker containers. They are completely managed by Docker and can be used to share data between containers and the Host system. There are three types of volumes that can be defined. Normal, path and named. Here […]
Read More ›
Here is a great video explaining the concents of Indexers and Delegators and the relationship between them in The Graph ecosystem. Source: https://thegraph.com/docs/network#overview
Read More ›